Bliss balls, also known as energy bites, are like little nuggets of happiness that pack a powerful punch of flavor and nutrition. Imagine biting into a soft, chewy ball that bursts with the richness of dates, the crunch of nuts, and a hint of cocoa. The aroma wafts through your kitchen, making you wonder if these delightful treats could possibly be healthy. mixed berry mini trifles Spoiler alert: they are! Whether you’re gearing up for a busy day or just need a sweet pick-me-up, bliss balls deliver all the goodness without any guilt.
Let’s take a stroll down memory lane. I remember the first time I made bliss balls; my kitchen looked like an explosion at a health food store. Ingredients were everywhere! Yet, amidst the chaos, I discovered my new favorite snack. These little bites of joy became my go-to treat for road trips and afternoon slumps. Perfect for kids’ lunches or an energizing snack during movie night, bliss balls are versatile enough to fit any occasion while keeping you fueled and satisfied.
Why You'll Love This Recipe
- These bliss balls are incredibly easy to prepare and require no baking, making them perfect for busy weeknights.
- Their rich flavor profile combines sweetness and nuttiness for a satisfying bite.
- Visually appealing with their delightful textures, they’re irresistible to both kids and adults alike.
- You can customize them based on your pantry staples or dietary preferences!
Ingredients for Bliss balls or energy bites
Here’s what you’ll need to make this delicious dish:
- Medjool Dates: These sweet gems provide natural sweetness and stickiness to hold everything together.
- Oats: Use rolled oats for texture; they give the bliss balls bulk and fiber.
- Nut Butter: Your choice of almond or peanut butter adds creaminess and protein.
- Cocoa Powder: Unsweetened cocoa powder gives a rich chocolatey flavor without added sugars.
- Chia Seeds: Packed with omega-3s, they add crunch and nutritional value.
- Honey or Maple Syrup: A touch of sweetness enhances the flavors; maple syrup is great for vegan options.
The full ingredients list, including measurements, is provided in the recipe card directly below.
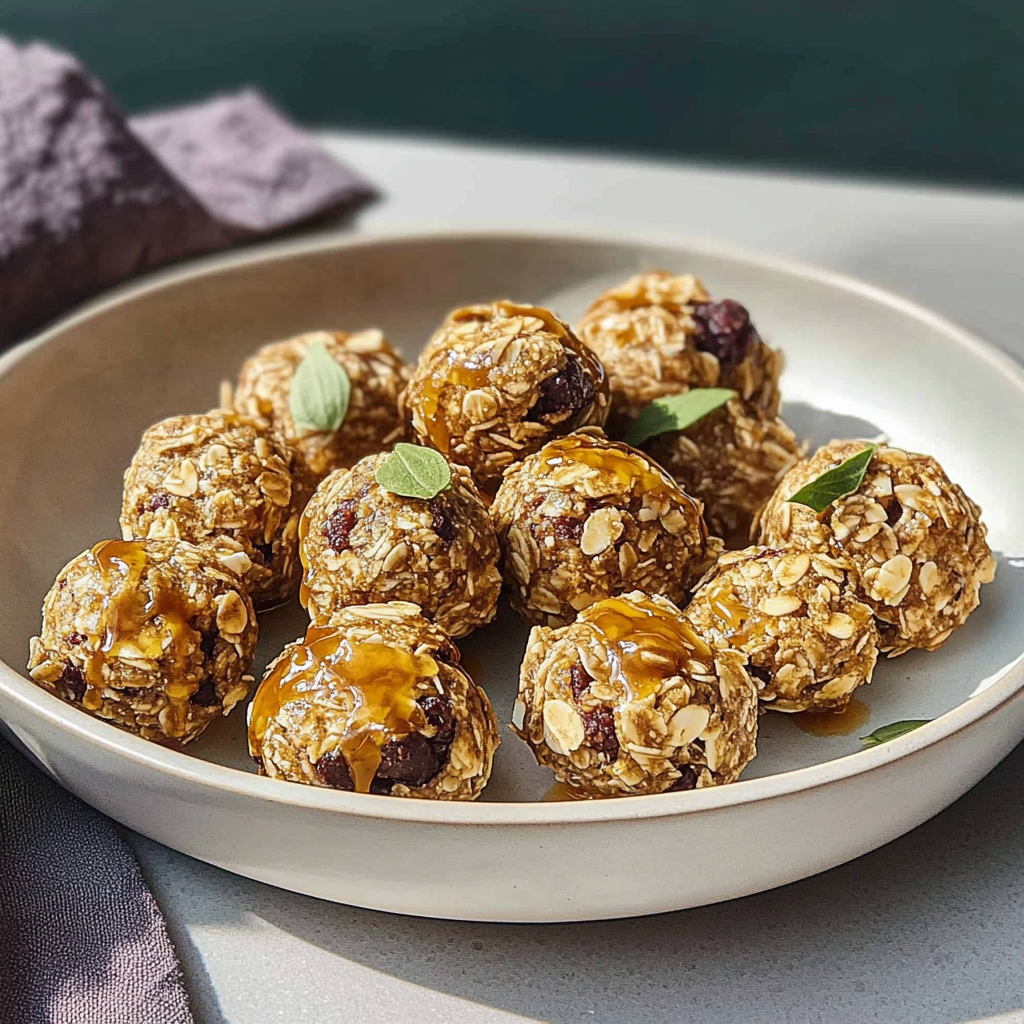
How to Make Bliss balls or energy bites
Follow these simple steps to prepare this delicious dish:
Step 1: Gather Your Ingredients
Start by assembling all your ingredients on the counter. Grab your food processor because it’s about to work some magic.
Step 2: Blend the Dates
Place the Medjool dates in the food processor and pulse until they form a sticky paste. If your dates are a bit dry, soak them in warm water for about ten minutes beforehand.
Step 3: Mix It All Together
Add oats, nut butter, cocoa powder, chia seeds, and honey or maple syrup into the processor with those lovely dates. Blend until everything is well combined but still has some texture.
Step 4: Shape Your Bliss Balls
Using your hands (or a small cookie scoop if you’re fancy), roll the mixture into small balls about one inch in diameter. Place them on a plate or tray lined with parchment paper.
Step 5: Chill Out
Pop those bliss balls in the refrigerator for about thirty minutes. This helps them firm up so that they’re easier to handle when you’re ready to devour them.
Step 6: Serve & Enjoy
Transfer your bliss balls into an airtight container and keep them refrigerated for up to one week if they last that long! Enjoy them as a quick snack or pre-workout boost whenever hunger strikes.
Now that you’ve whipped up these delicious bliss balls (or energy bites), you might find yourself snacking on them more often than you’d like to admit trust me; it’s hard to resist!
You Must Know
- These bliss balls or energy bites are not just delicious; they are a game-changer for snacking.
- Packed with nutrients, these little balls of joy can fuel your day.
- Easy to make and perfect for on-the-go munching, they fit right into any busy lifestyle.
Perfecting the Cooking Process
Start by measuring out all your ingredients for bliss balls or energy bites. This way, you won’t be scrambling around while trying to blend everything together. Blend your dry ingredients first, then add wet ones for a smooth mixture.
Add Your Touch
Feel free to customize these bliss balls or energy bites by swapping nuts or seeds based on your preference. You can also add in some spices like cinnamon or vanilla extract for an extra flavor punch that’ll leave you craving more.
Storing & Reheating
Store your bliss balls or energy bites in an airtight container in the fridge for up to two weeks. If you want to enjoy them warm, pop them in the microwave for about 10 seconds just enough to melt that chocolate!
Chef's Helpful Tips
- When making bliss balls or energy bites, always use fresh ingredients for the best flavor.
- Don’t be afraid to experiment with different nut butters; they can change the entire taste profile!
- If your mixture is too crumbly, a splash of water helps bind it perfectly.
Sharing a fun memory here: I whipped up a batch of these bliss balls or energy bites for a picnic once, and they disappeared faster than I could say “healthy snack.” My friends were begging for the recipe now that’s what I call a success! festive snack mix recipe.
FAQs :
What are bliss balls or energy bites?
Bliss balls, also known as energy bites, are small, nutrient-dense snacks made from a variety of ingredients such as nuts, seeds, dried fruits, and natural sweeteners. These bites provide a quick source of energy and are perfect for busy lifestyles. They can be customized with various flavors and add-ins like cocoa powder, coconut flakes, or protein powder. Samoa cheesecake with coconut Bliss balls are not only delicious but also healthy, making them a popular choice for those looking to maintain their energy levels throughout the day.
How do I make bliss balls or energy bites at home?
Making bliss balls or energy bites at home is simple and quick. Start by choosing your base ingredients, such as rolled oats or nuts. Blend them together in a food processor until finely chopped. Then add in sweeteners like honey or maple syrup, along with any additional flavorings like vanilla extract or spices. Once combined, roll the mixture into small balls and refrigerate for about 30 minutes to firm up. Enjoy your homemade energy bites as a healthy snack whenever you need an energy boost! For more inspiration, check out this healthy oat crepes recipe recipe.
Can I customize my bliss balls or energy bites?
Absolutely! One of the best things about bliss balls or energy bites is their versatility. You can easily customize them to suit your taste preferences or dietary needs. For example, if you’re vegan, use maple syrup instead of honey. You can also mix and match ingredients like nut butters, seeds, chocolate chips, or superfoods like chia seeds or spirulina. creamy butter pecan delight Experimenting with different combinations allows you to create unique flavors while ensuring your energy bites remain nutritious.
How long do bliss balls or energy bites last?
When stored properly in an airtight container in the refrigerator, bliss balls or energy bites can last for about one to two weeks. For longer storage, you can freeze them for up to three months. Just make sure to separate them with parchment paper before placing them in a freezer-safe container to prevent sticking. This way, you’ll always have a healthy snack ready whenever you feel hungry!
Conclusion for Bliss balls or energy bites :
In summary, bliss balls or energy bites are nutrient-packed snacks that offer quick bursts of energy for busy days. They are easy to make at home and can be customized with a variety of ingredients to suit personal tastes and dietary preferences. By preparing these delicious snacks ahead of time and storing them correctly, you can enjoy their benefits for weeks on end. Whether you’re looking for a pre-workout boost or a midday pick-me-up, these treats will keep you fueled and satisfied!
Bliss Balls (Energy Bites)
Bliss balls, or energy bites, are delightful no-bake snacks that combine rich flavors and wholesome ingredients. Packed with natural sweetness from Medjool dates, creamy nut butter, and a hint of cocoa, these treats offer a satisfying energy boost without the guilt. Perfect for a quick snack, lunchbox addition, or post-workout refuel, bliss balls are easy to make and endlessly customizable to suit your taste.
- Prep Time: 10 minutes
- Cook Time: 0 minutes
- Total Time: 10 minutes
- Yield: Makes approximately 12 bliss balls 1x
- Category: Snack
- Method: No-Bake
- Cuisine: Healthy
Ingredients
- 1 cup Medjool dates (pitted)
- 1 cup rolled oats
- 1/2 cup almond or peanut butter
- 1/4 cup unsweetened cocoa powder
- 2 tbsp chia seeds
- 2 tbsp honey or maple syrup
Instructions
- Gather all ingredients and place the Medjool dates in a food processor. Blend until they form a sticky paste.
- Add rolled oats, nut butter, cocoa powder, chia seeds, and honey or maple syrup to the processor. Blend until well combined but still textured.
- Roll the mixture into small balls (about 1 inch in diameter) using your hands.
- Place the balls on a parchment-lined tray and refrigerate for about 30 minutes until firm.
- Store in an airtight container in the fridge for up to one week.
Nutrition
- Serving Size: 1 bliss ball (30g)
- Calories: 115
- Sugar: 6g
- Sodium: 2mg
- Fat: 5g
- Saturated Fat: 1g
- Unsaturated Fat: 4g
- Trans Fat: 0g
- Carbohydrates: 15g
- Fiber: 2g
- Protein: 3g
- Cholesterol: 0mg
Keywords: Customize by adding your favorite nuts or seeds. For extra flavor, consider incorporating vanilla extract or spices like cinnamon. If the mixture is too crumbly, add a splash of water to help bind.


[…] I remember sneaking bites before it even hit the table because the aroma was impossible to resist. delicious energy bites Now, I’m here to share this delightful recipe with you so you can create your own delicious […]